
How to Trim Dog Nails Safely: A Step-by-Step Guide for Light and Black Nails


Why Is Regular Dog Nail Care Important?
Dog nails continually grow. Normal movement on abrasive surfaces may gradually wear them down, but natural wear is not sufficient for every dog. Nails that remain long can affect comfort, movement, and paw health.
When a long nail contacts the ground, pressure can be transmitted backward into the toe. The dog may adjust its posture or foot placement to avoid discomfort. Severely overgrown nails can interfere with normal paw contact, reduce traction, and make walking on smooth surfaces more difficult.
Long dog nails are also more likely to:
Catch on carpet, bedding, vegetation, or fencing
Split, crack, or tear
Place additional pressure on the toes
Reduce stability on slippery flooring
Become painful during walking or running
Make the paw appear flattened or splayed
Alter how the dog distributes weight
Curve toward or grow into the paw pad
Cause dewclaw injuries
Dewclaws require particular attention because they are positioned above the ground and usually receive little or no natural wear. A neglected dewclaw may become sharply curved and eventually enter the surrounding skin.
Regular nail checks also provide an opportunity to identify swelling, discoloration, broken nails, abnormal growth, inflammation, or pain. These changes may require veterinary evaluation rather than routine clipping.
Nail care should support comfortable, natural movement—not pursue a cosmetically short appearance. Dogs vary in paw shape and nail position, so the appropriate length cannot be determined by one universal measurement. The nails should be evaluated while the dog is standing naturally and walking on a firm, level surface.

How Can You Tell If Your Dog’s Nails Are Too Long?
The appearance of the nails provides useful information, but length should also be assessed while the dog is standing and walking naturally. Breed, toe shape, paw structure, and nail angle can make healthy nails look different between dogs.
Possible signs that dog nails are too long include:
The nails press firmly against the floor while the dog is standing
Loud clicking is heard with nearly every step on hard flooring
The nails curve noticeably toward the paw pads
The toes appear elevated, spread, or pushed backward
The dog slips frequently on tile, laminate, or polished floors
Walking becomes hesitant or the stride appears shortened
The dog licks or chews at the paws
A nail repeatedly catches on carpet, blankets, or vegetation
The dewclaws become long and tightly curved
The nails split, crack, or break repeatedly
The dog resists having a particular toe touched
A slight clicking sound does not automatically prove that every nail is dangerously long. Some dogs have naturally low-set nails that contact hard flooring even when reasonably maintained. However, nails that bear weight, force the toes upward, or interfere with normal paw placement should be evaluated.
Owners can also inspect the paws from the side while the dog stands squarely. In many dogs, appropriately maintained nails sit close to the ground without being the primary weight-bearing point. The paw pads—not the nail tips—should support most of the dog’s weight.
Check every toe individually. Front nails may wear differently from rear nails, and the middle nails may grow at a different rate from the outer ones. Dewclaws are easy to overlook because they do not normally touch the ground. Some dogs also have rear dewclaws or multiple dewclaws that require separate inspection.
A dog that suddenly develops an abnormal gait, begins limping, or avoids placing weight on one paw should not simply receive a nail trim. Broken nails, paw injuries, arthritis, joint disease, neurological problems, and other painful conditions can produce similar signs and may require veterinary examination.

Understanding Dog Nail Anatomy and the Quick
A dog’s nail consists of a hard outer keratin shell surrounding sensitive internal tissue. The living central portion is known as the quick. It contains blood vessels and nerves, which is why cutting into it causes pain and bleeding.
In a light or translucent nail, the quick often appears as a pink area extending from the base toward the tip. The hollow-looking or pale portion beyond the quick is the area that can generally be shortened.
The quick grows with the nail. When nails remain long for an extended period, the quick may extend farther toward the tip. This means a severely overgrown nail cannot always be shortened to the desired length in one session without causing injury.
The main structures involved in nail trimming include:
Outer nail shell: The hard keratin structure cut by clippers or shortened with a grinder
Quick: Living tissue containing nerves and blood vessels
Nail bed: Tissue supporting nail growth
Toe and digital pad: Structures that help support and stabilize the paw
Dewclaw: A higher-positioned nail that usually receives minimal natural wear
The objective of trimming is to remove only the non-living outer material while maintaining a safe distance from the quick. In light nails, the visible pink tissue provides guidance. In black or opaque nails, the quick cannot be identified from the outside, so the nail must be shortened through a series of very small cuts.
The cut surface of a black nail changes as the quick is approached. Initially, the surface may appear dry, pale, or chalky. A darker central area then begins to appear. When a small dark or glossy central dot becomes visible, trimming should stop because the living tissue is close.
Nail anatomy can vary between dogs and even between different toes on the same dog. Owners should never assume that every nail can be cut to exactly the same length. Each nail must be assessed separately.

Light vs. Black Dog Nails: What Is the Difference?
Light and black dog nails have the same basic anatomy. Both contain a hard outer shell surrounding the quick. The primary difference during trimming is visibility.
In pale, white, or translucent nails, the quick can often be seen as a pink structure inside the nail. This provides a visible boundary, although the cut should still be made several millimeters beyond it rather than immediately beside it.
Black or heavily pigmented nails conceal the quick. The person trimming cannot safely judge the cutting point from the exterior appearance alone. Instead, the nail must be shortened in small increments while monitoring the newly exposed surface after every cut.
A safer approach for black nails is to:
Remove approximately 1–2 mm at a time
Examine the cut surface after every clip
Stop when the center begins to look darker
Stop immediately if a small black or glossy dot appears
Avoid trying to match the length of neighboring nails
Leave extra length when uncertain
Some dogs have a combination of light and black nails. The visible quick in a light nail can provide a rough indication of nail anatomy, but it should not be used as an exact guide for the black nails. The quick can extend to different lengths in separate toes.
A flashlight may help illuminate some partially pigmented nails, but it cannot reliably reveal the quick in every black nail. It should be treated as an additional aid rather than proof that a particular cutting point is safe.
Black nails are not inherently unhealthy or impossible to trim. They simply require better lighting, sharper tools, smaller cuts, and more patience.
How Short Should Dog Nails Be?
There is no single ideal measurement for every dog. Appropriate nail length depends on the dog’s paw shape, nail angle, breed, age, activity, walking surface, and the position of the quick.
In general, the nails should remain short enough that they do not force the toes upward or become the main point of contact with the ground. When the dog stands naturally on a firm surface, the paw pads should carry the body’s weight.
The goal is not to cut the nail flush with the toe or make it look extremely short. Cutting aggressively increases the risk of reaching the quick, particularly when the nails have been overgrown for a long time.
For light-colored nails, leave approximately 2–3 mm between the cut and the visible quick. For black nails, remove only 1–2 mm at a time and inspect the cut surface repeatedly.
Signs that it is time to stop include:
The pink quick is approaching in a light nail
A darker central area appears in a black nail
A small glossy or black dot becomes visible
The nail becomes softer or more sensitive
The dog suddenly reacts when a previously comfortable nail is clipped
You are no longer certain that another cut is safe
Not all nails need to end at the same length. The quick may be longer in one toe, and the rear nails may wear more naturally than the front nails. Dewclaws often retain a different shape because they do not contact the ground.
If the nails are severely overgrown, do not attempt to reach the ideal length in one session. Small, repeated trims can encourage the quick to recede gradually, allowing the nail to be shortened more safely over time.
Dog Nail Clippers vs. Grinders: Which Is Better?
Both nail clippers and grinders can shorten dog nails safely when used correctly. The better option depends on the dog’s nail size, temperament, previous experiences, and tolerance for sound and vibration.
Nail clippers remove length quickly. They are useful for dogs that tolerate paw handling but become impatient during longer grooming sessions. Sharp clippers make a clean cut with minimal time spent on each nail.
Common clipper types include:
Scissor-style clippers: Provide good control and are often suitable for small or medium nails.
Pliers-style clippers: Offer greater cutting force for thick nails and large dogs.
Guillotine-style clippers: Can work effectively but may make the cutting angle and nail surface more difficult to see.
Dull clippers may crush, split, or twist the nail instead of cutting it cleanly. Safety guards can reduce the amount inserted into the tool, but they should not be trusted to identify the quick. Nail anatomy differs between dogs and individual toes.
A nail grinder removes keratin gradually. It can smooth sharp edges and may provide more control when working with black dog nails. However, grinders introduce noise, vibration, heat, and nail dust.
Potential advantages of a grinder include:
Gradual removal of small amounts
A smoother, rounded nail edge
Greater control around black or thick nails
Less risk of splitting brittle nails
Potential disadvantages include:
Noise and vibration that may frighten the dog
Heat buildup if held against one nail too long
Risk of catching long paw hair in the rotating tool
A longer procedure compared with clipping
Nail dust and odor
When using a grinder, work in brief intervals of approximately one to three seconds per nail and move between nails to prevent heat accumulation. Long hair around the paw must be kept safely away from the rotating head.
Some owners use both tools: clippers remove the excess length, and a grinder smooths the edges. The safest tool is the one the handler can control confidently and the dog can tolerate without force.
What Do You Need to Trim Dog Nails Safely?
Organizing the equipment before bringing the dog into position makes the procedure shorter and calmer.
Useful supplies include:
Dog-specific nail clippers or a pet nail grinder
Bright, focused lighting
High-value treats
Styptic powder
Clean gauze or cotton pads
A non-slip mat
A flashlight for partially translucent nails
A second person if the dog accepts gentle assistance
Choose clippers appropriate for the dog’s nail size. Large clippers may be difficult to position accurately on a small dog, while lightweight clippers may crush or fail to cut thick nails.
Styptic powder should be open and within reach before trimming begins. If the quick is accidentally cut, immediate pressure and styptic powder can help control minor bleeding.
The surface beneath the dog should provide secure footing. A dog that slips while its paw is being held may panic, pull away, or twist a toe. A rubber-backed mat or textured floor can improve stability.
If using a grinder, also check that:
The battery is charged
The grinding attachment is secure
The speed is appropriate
Long paw hair is protected from the rotating head
The dog has been introduced gradually to the sound and vibration
Human nail clippers should not be used on most adult dogs. Their flat cutting surfaces are not designed for thick, curved canine nails and may cause crushing or splitting. Very small puppy nails can sometimes be managed with appropriate small tools, but dog-specific equipment provides better control.
How to Prepare Your Dog for Nail Trimming
Preparation should begin before the first nail is cut. Dogs that suddenly experience restraint, paw pressure, and the sound of clippers may become frightened even when no pain occurs.
Introduce the process gradually:
Touch the shoulder or upper leg and offer a treat.
Move your hand down the leg without holding the paw.
Touch and briefly support one paw.
Handle individual toes gently.
Place the closed clippers near the paw.
Create the clipper sound away from the nail and reward the dog.
Touch the clipper or switched-off grinder to one nail.
Introduce grinder sound and vibration from a comfortable distance.
Trim or grind only one nail and provide a high-value reward.
This process may take one session for a relaxed dog or several weeks for a fearful dog. Progress should follow the dog’s comfort rather than a predetermined timetable.
Early stress signals include:
Turning the head away
Lip licking or repeated yawning
Pulling the paw back
Freezing or becoming unusually still
Showing the whites of the eyes
Tucking the tail
Panting without heat or exercise
Growling, snapping, or attempting to escape
Stop before discomfort escalates into panic or defensive behavior. Growling should be treated as communication—not disobedience. Punishment or forceful restraint can make future nail care more difficult and increase the risk of injury.
Choose a quiet time when the dog is calm. Exercise, feeding, or a familiar relaxation routine may help some dogs settle. Lickable rewards can provide continuous positive reinforcement, but foods must be safe for dogs and appropriate for the individual animal’s diet and medical needs.
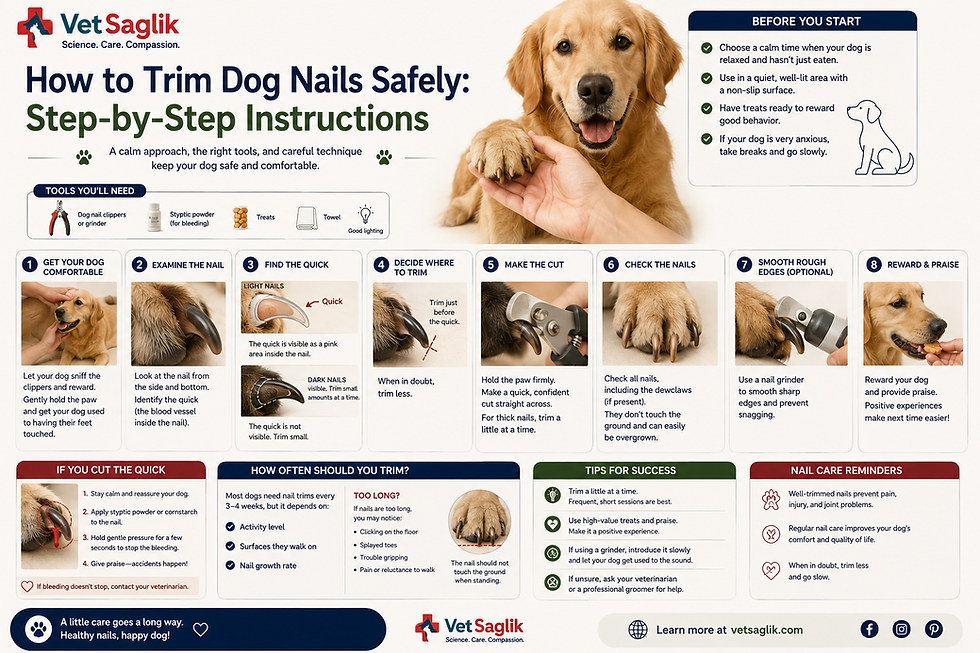
How to Trim Dog Nails Safely: Step-by-Step Instructions
The dog should stand, sit, or lie in a position that feels secure and allows the handler to see each nail clearly. There is no need to place every dog in the same position.
Allow the dog to settle.
Place the dog on a non-slip surface in a quiet, well-lit area. Keep treats, clippers, styptic powder, and gauze within reach.
Support one paw gently.
Hold the paw securely enough to prevent sudden movement without squeezing it. Keep the leg in a natural position and avoid pulling it far backward or sideways.
Separate the toe and move fur aside.
Isolate one nail so that the clipper cannot catch hair or another toe. Long paw hair must be controlled carefully when using a grinder.
Examine the nail.
Identify the visible pink quick in a light nail. For a black nail, plan to remove only a very small amount before inspecting the cut surface.
Position the clippers correctly.
Place the blades around the excess nail tip. Make sure no skin, fur, or paw pad is between the blades.
Remove a small amount.
Make one controlled cut. Do not attempt to reach the final length immediately, especially when the quick is difficult to identify.
Inspect the cut surface.
Look for changes in color and texture before deciding whether another cut is safe. With black nails, this inspection is essential after every 1–2 mm removed.
Smooth sharp edges if necessary.
A grinder or nail file can round a rough edge. If using a grinder, touch the nail briefly and move to another toe before heat develops.
Check the dewclaws.
Examine any front or rear dewclaws separately because they may be longer and more curved than weight-bearing nails.
Reward and release the paw.
Offer a treat and allow a break. Completing one or two nails calmly is preferable to forcing an entire paw.
Continue only while the dog remains comfortable. Stop if the dog repeatedly pulls away, freezes, growls, snaps, pants heavily, or attempts to escape.
After trimming, check every treated nail for bleeding, splitting, or rough edges. Allow the dog to walk on a firm surface and observe whether it moves comfortably.
How to Trim Black Dog Nails Without Cutting the Quick
Black dog nails require a gradual approach because pigmentation conceals the quick. The safest technique is to remove very thin slices while examining the center of the nail after every cut.
Begin at the tip and remove approximately 1–2 mm. The first cut surface may look dry, chalky, or uniformly pale. If the nail remains clearly non-living and the dog is comfortable, another small amount may be removed.
As the quick is approached, the central appearance begins to change. Depending on the dog and lighting, you may notice:
A darker central circle
A small black or gray dot
A glossy central area
A softer-looking center surrounded by harder nail
Increased sensitivity when the nail is handled
Stop when a small dark or glossy central dot becomes visible. This indicates that the living tissue is close, even if bleeding has not occurred.
Do not rely on one visual sign alone. Black nails vary in pigmentation, thickness, and internal appearance. When uncertain, leave the nail slightly longer.
A grinder may provide more gradual control, but the same precautions apply. Examine the surface frequently and avoid holding the tool against the nail long enough to produce heat.
A light-colored nail on the same paw may offer a general reference, but it cannot reveal the exact quick length of a black nail. Each toe must be evaluated independently.
The safest method for black nails is:
Use bright, direct lighting
Stabilize one toe without twisting it
Remove no more than 1–2 mm at a time
Inspect after every cut
Stop at the first dark or glossy central dot
Never continue simply to match neighboring nails
Keep styptic powder ready
If the nails are severely overgrown, the quick may extend almost to the tip. In that situation, only a minimal amount can be removed safely during the first session. Repeated conservative trims may allow the quick to recede gradually.
How Should You Trim a Dog’s Dewclaws?
Dewclaws are positioned higher on the inside of the leg and usually do not touch the ground. Most dogs have dewclaws on the front legs, while some also have rear dewclaws. Certain breeds may have double rear dewclaws.
Because dewclaws receive little natural wear, they can become long, sharply curved, or embedded in the surrounding skin. They may also catch on vegetation, blankets, fencing, or other objects and tear during activity.
To trim a dewclaw safely:
Locate every dewclaw, including any on the rear legs.
Separate surrounding fur so the nail and skin are clearly visible.
Support the toe without pulling it away from the leg.
Identify the quick when the nail is light-colored.
Remove only the curved excess tip.
Use very small cuts when the dewclaw is black or heavily pigmented.
Stop if the nail is painful, swollen, fractured, or embedded.
Dewclaws can grow in a tighter curve than the other nails. This may make it difficult to position standard clippers safely. Do not force the clipper between the nail and skin when there is insufficient space.
A dewclaw that has entered the skin should be treated by a veterinarian. Simply cutting the visible nail may not address pain, infection, or damage beneath the surface.
Rear dewclaws can vary considerably in their attachment and mobility. Some are firmly connected to bone, while others are attached more loosely by soft tissue. Handle them gently and avoid twisting or pulling during nail care.
How Often Should You Trim Dog Nails?
There is no universal schedule for every dog. Some dogs require trimming every few weeks, while others maintain much of their nail length through regular activity on abrasive surfaces.
Factors affecting trimming frequency include:
Nail growth rate
Age and activity level
Walking surface
Breed and paw structure
Body weight and gait
Time spent indoors
Orthopedic or neurological disease
Previous nail length and quick position
Presence of dewclaws
A practical approach is to inspect the nails every two to four weeks and trim only when needed. Dogs with fast-growing nails, limited mobility, or severely overgrown nails may initially require more frequent attention.
Pavement and other firm surfaces can wear down some weight-bearing nails. However, natural wear is often uneven and does not shorten dewclaws. One paw or individual toe may still require trimming even when the other nails appear acceptable.
Indicators that another trim may be needed include persistent floor contact, altered toe position, snagging, increasing curvature, and loud clicking on hard surfaces. Clicking alone should be considered alongside the dog’s paw structure and standing posture.
Puppies should be introduced to gentle paw handling and grooming tools early, but nail trimming should remain brief and positive. The objective is to build lifelong cooperation rather than achieve perfectly short nails during every session.
Can Severely Overgrown Dog Nails Be Shortened at Once?
Usually not. When nails remain long for an extended period, the quick may grow farther toward the tip. Cutting the nail directly to the desired final length could therefore sever living tissue and cause pain and bleeding.
Overgrown nails should be shortened gradually. A small amount can be removed, followed by another conservative trim after the quick has had time to recede. The process may require several sessions over weeks or months.
The appropriate interval and amount depend on:
How far the quick has extended
Whether the nails are light or black
The degree of curvature
The dog’s comfort and mobility
Whether any nail is fractured or embedded
The owner’s ability to identify a safe cutting point
A grinder can help remove small amounts with control, but it cannot make an extended quick disappear immediately. Excessive grinding can still reach living tissue or generate painful heat.
Veterinary assistance is recommended when:
A nail is touching or entering the paw pad
The dog is lame or visibly painful
The nails are severely curled or deformed
The dog cannot stand safely for trimming
Several nails are cracked, infected, or bleeding
Safe trimming would require forceful restraint
The dog has a bleeding disorder or uses medication affecting clotting
The objective is gradual restoration of functional nail length, not an immediate cosmetic result. Repeated small trims are safer than one aggressive cut.
What Should You Do If You Cut the Quick?
Cutting the quick causes pain and bleeding because it contains nerves and blood vessels. Although a minor quick injury can often be managed at home, the dog should be kept calm while bleeding is controlled.
If the quick is cut:
Stop trimming immediately.
Keep the dog from running or licking the nail.
Apply styptic powder directly to the cut surface.
Hold firm, gentle pressure with clean gauze for several minutes.
Avoid repeatedly removing the gauze to check the nail.
Keep the paw clean and dry after bleeding stops.
Monitor the nail for renewed bleeding, swelling, discharge, or persistent pain.
Do not apply alcohol or hydrogen peroxide directly to the exposed quick. These products can sting and irritate sensitive tissue.
Contact a veterinarian if:
Bleeding continues after 10–15 minutes of firm pressure
Blood flow is heavy or repeatedly restarts
The nail is split or partially torn
The dog remains significantly painful or lame
The dog has a known bleeding disorder
The dog takes medication that affects clotting
Redness, swelling, discharge, or odor develops
The injury resulted from trauma rather than routine trimming
Walking may restart bleeding by placing pressure on the injured nail. Restrict running, jumping, and rough play until the surface is dry and stable.
A painful experience can also create lasting fear of nail trimming. Future sessions should return to gentle paw handling, treats, and very small cuts after the nail has healed.
How to Trim the Nails of a Dog That Is Afraid or Resists
Fearful resistance should not be treated as stubbornness or disobedience. Dogs may struggle because of previous pain, sensitivity around the feet, fear of restraint, clipper noise, grinder vibration, or an underlying medical condition.
Begin below the dog’s fear threshold. The first sessions may involve no trimming at all.
A gradual desensitization plan may include:
Showing the grooming tool from a distance and offering a treat.
Moving the tool closer while the dog remains relaxed.
Touching the shoulder and moving gradually toward the paw.
Briefly supporting one paw without manipulating the toes.
Touching a closed clipper or switched-off grinder to one nail.
Creating clipper sounds away from the paw.
Introducing grinder noise from a distance.
Trimming or grinding a single nail.
Ending the session with a valuable reward.
Progress should be measured by the dog’s body language, not by the number of nails completed. One calm nail is more valuable than finishing all four paws through force.
Stop the session if the dog:
Freezes or becomes rigid
Repeatedly pulls the paw away
Shows the whites of the eyes
Tucks the tail
Growls, bares teeth, or snaps
Pants heavily without physical exertion
Attempts to hide or escape
Becomes unable to take treats
Do not punish warning behaviors. Growling communicates discomfort and provides an opportunity to stop before a bite occurs.
Physical restraint may worsen fear and create danger for the dog and handler. If the nails are causing a medical problem but cannot be trimmed safely, a veterinarian can develop an individualized plan. This may include behavior modification, pre-visit medication, pain assessment, or veterinary sedation.
Never give human sedatives, leftover prescriptions, or unapproved calming products without veterinary guidance.
Common Dog Nail-Trimming Mistakes to Avoid
Many nail-trimming injuries occur because the handler removes too much at once, relies on an unreliable visual shortcut, or continues after the dog becomes distressed.
Common mistakes include:
Cutting close to the visible quick
Removing large sections from black nails
Trying to make every nail exactly the same length
Ignoring changes in the cut surface
Using dull, damaged, or incorrectly sized clippers
Trusting a clipper safety guard to locate the quick
Holding a grinder against one nail until it becomes hot
Allowing long paw hair to enter the grinder
Pulling or twisting the leg into an unnatural position
Forgetting the dewclaws
Forcing the dog to complete all four paws in one session
Punishing growling, pulling away, or fear
Trimming a painful, fractured, or embedded nail at home
Attempting to shorten severely overgrown nails in one session
Beginning without styptic powder or a bleeding-control plan
Using human nail clippers on thick adult dog nails
Another mistake is assuming that every clicking nail must be cut immediately. Nail length should be assessed alongside paw conformation, standing posture, surface contact, and comfort.
The safest rule is simple: when uncertain, remove less and reassess.
When Should a Veterinarian or Groomer Trim Your Dog’s Nails?
An experienced groomer can help with routine nail maintenance when the dog is comfortable with handling and the nails are healthy. A veterinarian is more appropriate when pain, disease, severe fear, or injury is involved.
Veterinary examination is recommended if:
A nail has grown into the paw pad
A nail is broken, torn, or partially detached
The toe is swollen, red, bleeding, or producing discharge
The dog is lame or avoids placing weight on the paw
Several nails are brittle, discolored, or deformed
The dog reacts painfully when one toe is touched
Bleeding does not stop with pressure
The nails are severely overgrown and the quick is extended
The dog has a bleeding disorder
The dog uses medication affecting blood clotting
Safe trimming would require forceful restraint
Fear has progressed to growling, snapping, or biting
A veterinarian can determine whether abnormal nail growth is related to trauma, infection, inflammation, immune-mediated disease, nutritional problems, or another medical condition.
Dogs with arthritis, spinal disease, neurological problems, or painful hips and knees may resist nail trimming because the required position is uncomfortable. Treating the underlying pain and modifying the dog’s position may make future grooming safer.
Professional assistance is not a failure. The priority is to maintain healthy nails without causing avoidable pain, panic, or injury.
Frequently Asked Questions
Do All Dogs Need Their Nails Trimmed?
No. Some active dogs naturally wear down their weight-bearing nails by walking and running on firm surfaces. Other dogs require regular trimming because their nails grow faster than they wear. Dewclaws still need inspection because they usually do not contact the ground.
Should Dog Nails Touch the Floor?
The paw pads should support most of the dog’s weight. Nails that press firmly against the floor, force the toes upward, or interfere with normal paw placement may be too long. A light clicking sound alone does not always indicate a serious problem because nail position varies between dogs.
Is It Better to Clip or Grind Dog Nails?
Neither method is universally better. Clippers shorten nails quickly, while grinders provide gradual removal and smoother edges. Some dogs dislike the pressure of clippers, whereas others fear the sound and vibration of a grinder. The safest option is the tool the handler can control and the dog can tolerate calmly.
How Can You Find the Quick in Black Dog Nails?
The quick cannot usually be seen through the outside of a black nail. Remove approximately 1–2 mm at a time and inspect the cut surface after every clip. Stop when a darker, softer, or glossy central dot becomes visible. When uncertain, leave the nail longer.
Can Long Nails Affect a Dog’s Walking or Joints?
Severely overgrown nails can change how the toes contact the ground and may cause discomfort, slipping, or compensatory paw placement. However, nail length is not the only possible cause of gait changes. Lameness, weakness, or persistent movement abnormalities require veterinary evaluation.
How Often Should Dog Nails Be Trimmed?
Frequency depends on growth rate, activity, walking surfaces, paw structure, age, and health. Inspecting the nails every two to four weeks is a reasonable starting point. Some dogs need frequent trimming, while others require only occasional maintenance.
Can Walking on Pavement Keep Dog Nails Short?
Pavement can naturally wear down some weight-bearing nails, but wear may be uneven. It generally does not shorten dewclaws. Walking should meet the dog’s exercise and welfare needs rather than being increased excessively solely to grind down the nails.
Does Cutting Dog Nails Hurt?
Cutting only the non-living nail material should not hurt. Cutting into the quick is painful because it contains nerves and blood vessels. Pressure from dull clippers, excessive grinder heat, or twisting a painful toe can also cause discomfort.
What Happens If You Cut a Dog’s Nail Too Short?
Cutting the quick causes pain and bleeding. Apply styptic powder and firm pressure with clean gauze. Contact a veterinarian if bleeding continues after 10–15 minutes, the nail is torn, or the dog remains painful or lame.
Can You Use Human Nail Clippers on Dogs?
Human nail clippers are generally unsuitable for adult dog nails. Their flat blades may crush or split thick, curved nails. Sharp clippers designed for the dog’s nail size provide better visibility and control.
How Can You Calm a Dog That Hates Nail Trimming?
Use gradual desensitization and positive reinforcement. Begin with brief paw touching and exposure to the tool without cutting. Progress to one nail only when the dog remains comfortable. Stop if the dog freezes, growls, snaps, or attempts to escape.
When Are Dog Nails Too Long for Home Trimming?
Professional assistance is advisable when the nails curve into the paw pads, the dog is lame, several nails are fractured, the quick has extended close to the tip, or safe trimming would require forceful restraint. A veterinarian should manage painful, infected, embedded, or severely overgrown nails.
Can an Overgrown Quick Become Shorter?
The quick may gradually recede when the nail is shortened conservatively over repeated sessions. It cannot safely be removed in one aggressive trim. The process may take weeks or months depending on the degree of overgrowth.
Should Dewclaws Be Trimmed?
Dewclaws should be checked regularly because they receive little natural wear. They should be trimmed when excessively long or curved, but only the safe outer portion should be removed. Embedded, fractured, or painful dewclaws require veterinary care.
Sources
Official organization or scientific publication | Open URL |
PDSA – How to Clip Your Dog’s Nails | |
PDSA – Vet Q&A: How Do I Cut My Dog’s Nails Safely? | |
PDSA – How Often Should You Groom Your Pet? | |
Blue Cross – How to Cut Your Dog’s Nails | |
Blue Cross – How to Groom a Dog | |
AVMA Journal – Risk Factors for Digit Injuries Among Dogs | |
Mersin Vetlife Veterinary Clinic |


Comments